Thursday, December 7, 2017

Automate Flow: Auto enable WiFi when you arrive home and disable WiFi when you leave home

This is an example of Automate flow. To learn more about Automate for Android phones, click here.

It is always a good idea to disable the WiFi function of your Android phone until you want to connect to a WiFi network. This will help to conserve battery usage, and also prevent your phone from automatically get connected to certain open WiFi without your aware, which might be used to hack in your phone.

Normally, there are fix places with WiFi that you will definitely want to use, to conserve your mobile Internet data quota usage. Those places include your home and/or your work place.

This Automate flow will help you to automatically disable WiFi function of your phone after your leave your home, and automatically enable it back when you arrive your home. It will even inform you by voice so that you are aware when WiFi is automatically enabled and disabled by this flow.


Enabling WiFi function does not guarantee a successful connection, because sometimes your access point (AP) or wireless router might have problem in establishing the WiFi connection.

Therefore, after enabling WiFi, this flow will wait for 10 seconds, which should be long enough for normal WiFi connection to be established. It will then check if the connection is successful or not.

If the connection is successful, it will log down the name a.k.a. SSID (service set identifier) of the AP or wireless router your phone has connected to.

If the connection is not successful, it provides option for you to remain enable WiFi or to disable it. Regardless of your selection, you will still need to troubleshoot and find out why the WiFi connection cannot be established. It could be caused by your AP or wireless router is switched off, or hang, or WiFi function disabled, or DHCP IP address allocation full, or other possible issue. If your phone has never made a successful connection with the WiFi at the location before, or you have made your phone "forget" about it, the connection will also be not successful as well.

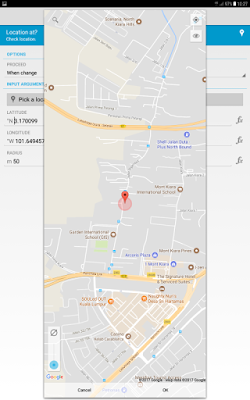
Before you can use this flow, you need to tell it where is your home. This can be done by tapping on Block 12 "When at location". The following screen will come out.

Tap on the "Pick a location on map..." button to bring out Google map. You can then search for your home by either tapping on the "target" icon if you are currently at home, or by tapping on the search (magnifying glass) icon and key in your home address for search, or by manually selecting the location by navigating the map and tap on the targetted place.


When you are done, tap on the OK button below to capture the location's coordinate.

The Radius setting determines the area that you consider your phone is at home. Normally, 50 meter radius as shown above is a good choice. You can set its value larger so that your WiFi is automatically enabled faster when your approaching home, and automatically disabled after you have travelled further away from your home.

You can use this same flow for other places with fixed WiFi, such as your work place. Just go through the same steps able to set the location before running it. You might also want to change the word from "home" to "office" in Blocks 14, 15, 16 and 17 of the flow.

With slight modification, you can even expand this flow to be used for multiple locations.

Wednesday, December 6, 2017

Automate Flow: Always go back to Home screen whenever phone is unlocked at launcher screen

This is an example of Automate flow. To learn more about Automate for Android phones, click here.

This is a very simple Automate flow with only 4 blocks (including the Flow beginning block).

Most if not all Android launchers support multiple screens for you to organize your apps and widgets into different screen as needed. One of the screens is your Home screen, which normally is where you put your mostly accessed apps and widgets.

When you are at the launcher screen without any opened foreground app, you can always go back to the Home screen by pressing your phone's Home soft key or Home button.

If most of the time, when you unlock your phone and start using it, you want to be at the Home screen regardless of which launcher screen you were at when your phone went to sleep and locked itself, this is exactly what this Automate flow will do.


This flow will wait until you unlock the phone, and check if you are at the launcher screen (meaning, no app is opened at the foreground). If yes, it will emulate pressing the Home button so that you will go to the Home screen automatically.

If you were running an app at the foreground (such as Whatsapp, browser, email, Facebook, etc.) when the screen was last locked, the flow will do nothing and you will return to the app screen after unlock.

In order for this flow to work properly, you need to set the correct launcher app of your phone in the "Is foreground app" block, because different Android phone vendor might provide their own launcher app to the phone. In addition, Android system also allows you to install and use 3rd party launcher app such as Nova launcher, Apex launcher, TSF launcher, etc.


You can tap on the "Pick activity..." button as shown above to select the launcher app you use in your phone.

The setting in the above screen is for Samsung TouchWiz launcher. For HTC phones, set the Package to "com.htc.launcher" and leave the Activity Class as empty field.

What if you never set any screen lock to your phone? In that case, you just need to change the "When device unlocked" block to "When screen is on" block.

Monday, December 4, 2017

Automate Flow: Switch your phone between Vibrate and Normal profile with customized mute

This is an example of Automate flow. To learn more about Automate for Android phones, click here.

Your Android phone is likely to have 3 general sound profiles:

  • Normal - ringer (for incoming calls) and notification will play a sound.
  • Vibrate - ringer and notification will mute. The phone will vibrate when there is incoming call.
  • Silent - ringer and notification will mute. There will be no vibration as well.
In fact, your Android phone has the following 6 types of sound, which you can set their volume individually (note: certain phone has paired the ringer and notification sound volume, so that the notification volume will always follow the ringer volume):
  • Ringer - for ringing tone sound
  • Notification - for notification sound
  • Media - for music and sound in apps, including Whatsapp, Facebook, Youtube, etc.
  • Alarm - for alarm sound
  • In-call - for phone conversation
  • System - for shutter sound of camera, screen lock/unlock sound, keyboard sound, etc.
When you switch your phone's sound mode from one to another among Normal, Vibrate and Silent, the volume of these 3 sounds will be changed accordingly: Ringer, Notification and System.

Note that the sound volume of Media, Alarm and In-call remains unchanged. This means when your phone is set to Vibrate or Silent mode, your instant messenger apps will remain unmuted and will still giving out sound, because Media sound remains unchanged.

You might want to also mute the Media sound when you set your phone to Vibrate or Silent mode, and un-mute the Media sound when you set it back to Normal mode.

Of course, there are apps that enable you to set additional customized sound profiles, but I am going to share with you how you can do it yourself by using a simple Automate flow.

The flow below will help you toggle between Vibrate and Normal sound mode. Since the Notification and System sound will follow when the Ringer sound changed, you just need to toggle the Ringer mode.

The beauty of this flow is on its next step. When you toggle the Ringer mode to Vibrate, it will also mute the Music audio. When you toggle it to Normal, it will unmute the Music audio accordingly.

To use this flow, run it once to enter Vibrate mode, and run it again to go back to Normal mode. The flow will display a message about the mode you have changed to, and end.

With this example, I'm sure you can easily modify it to toggle between Silent and Normal mode and save it as another flow.

You can also make it a single flow to toggle among Silent, Vibrate and Normal mode. That will require another block to check "Is ringer mode Vibrate?" when "Is ringer mode Normal?" returned a No. If this returns Yes, you might want to set ringer mode Silent, mute audio Music, and display "Silent mode" in the toast.

Hint: Click on the "Older Posts" link to continue reading, or click here for a listing of all my past 3 months articles.